
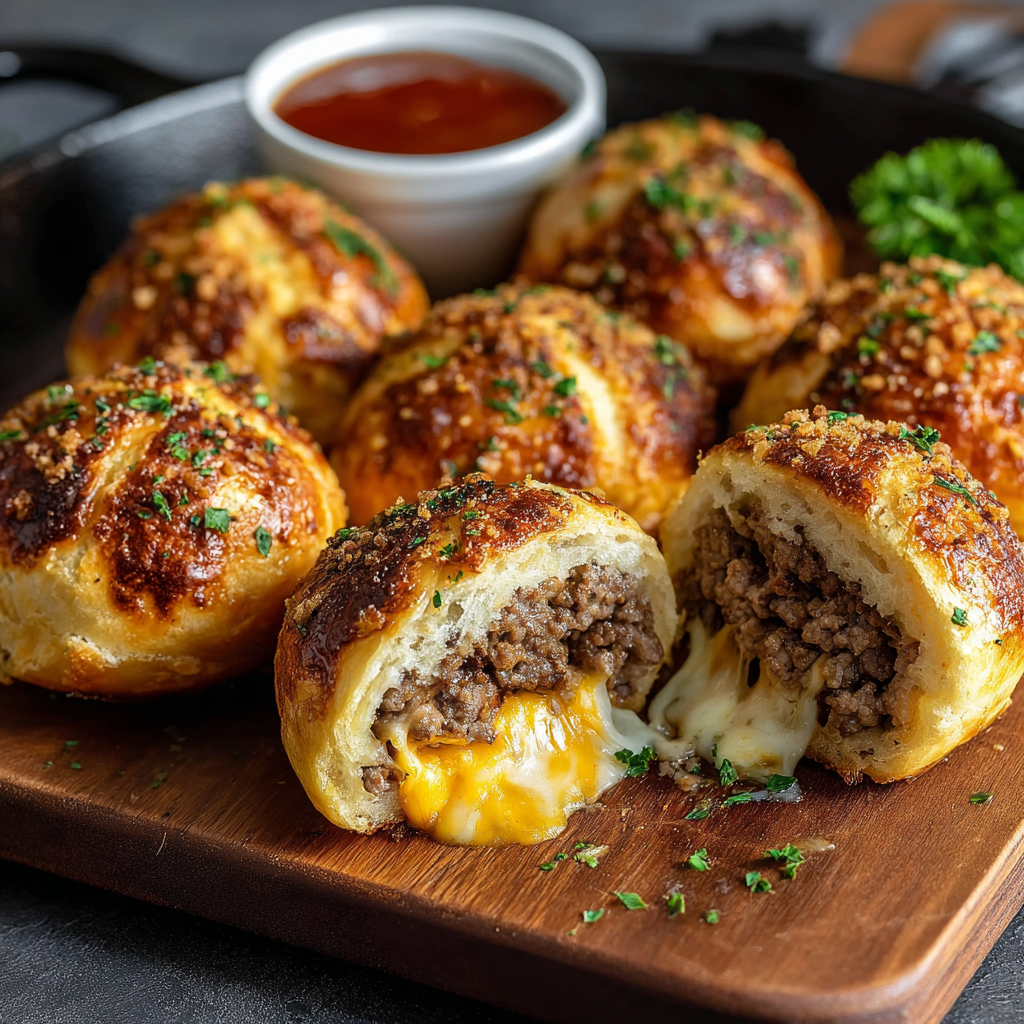
Garlic Parmesan Cheeseburger Bombs

Flaky biscuit pockets filled with garlicky ground beef and melted cheeses — a crowd-pleasing appetizer or fun weeknight snack ready in 30 minutes.
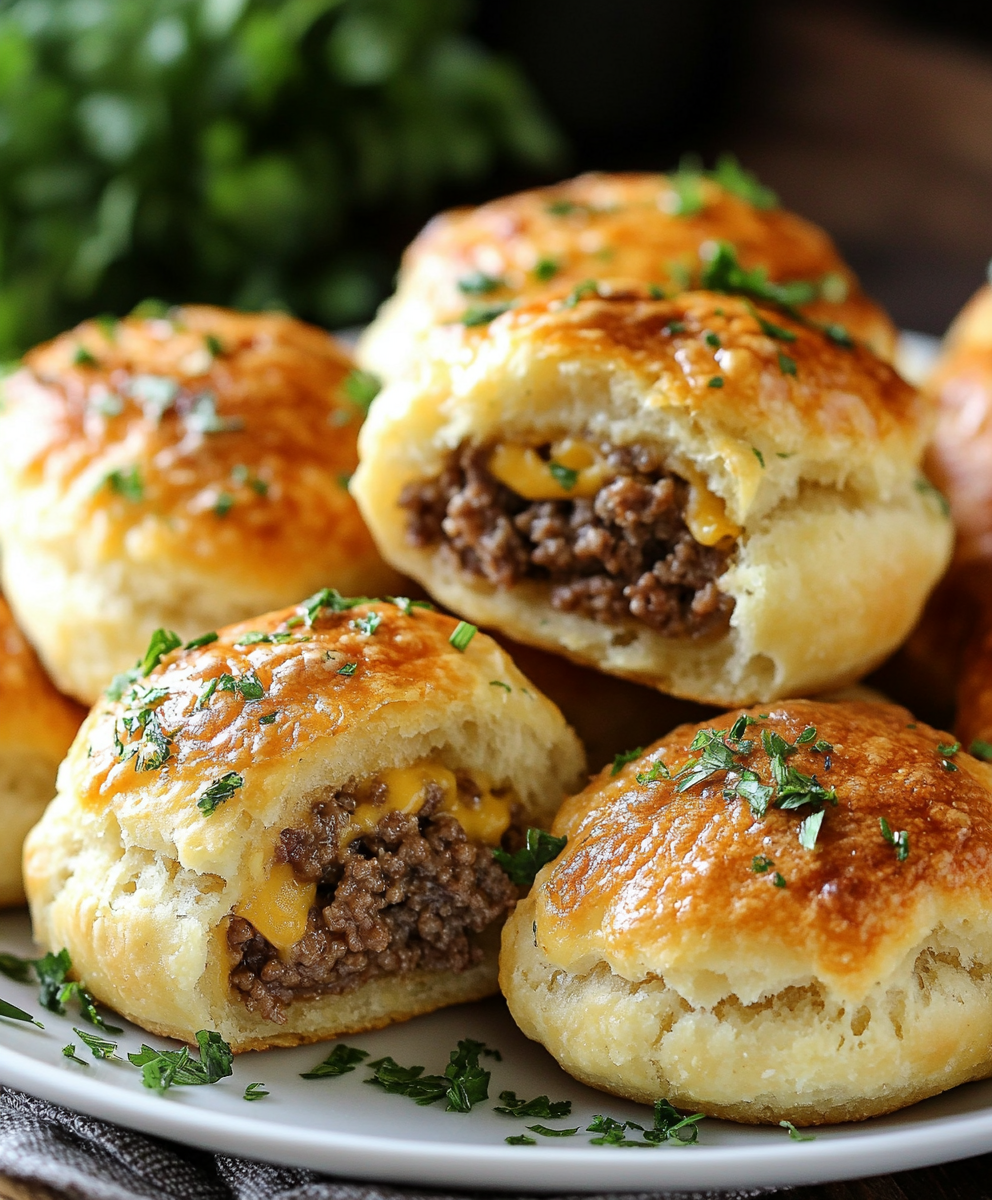
This recipe started as a late-night experiment the first time I wanted cheeseburgers in a hurry but didn’t want a plate full of dishes. Garlic Parmesan Cheeseburger Bombs are flaky biscuit pockets filled with a sizzling mixture of seasoned ground beef, garlic, Parmesan, and cheddar, baked until golden. I first discovered the combination on a busy weekend when friends dropped by unexpectedly; the skillet filled the kitchen with savory aromas and the biscuits gave the perfect handheld finish. What makes these memorable is the contrast between the rich, slightly salty cheese-beef filling and the buttery, tender biscuit shell.
They shine as an easy appetizer for game day, a shareable snack for movie night, or even an informal main when paired with a crisp salad. The filling is straightforward but flavorful: quick browning of the meat, a couple cloves of garlic, and a blend of sharp cheddar with nutty Parmesan. Using canned biscuit dough keeps prep short and gives consistent, flaky results. Over the years I’ve made small adjustments — a pinch of smoked paprika here, a dab of mustard there — but the core is simple and reliably delicious.
Why You'll Love This Recipe
- Ready in about 30 minutes from start to finish, making it ideal for last-minute guests or a quick weeknight treat.
- Uses pantry and fridge staples: ground beef, canned biscuits, cheddar, and Parmesan — no specialty shopping required.
- Handheld and shareable: perfect for parties, potlucks, or a casual main course with salad or roasted vegetables.
- Make-ahead friendly: filling can be prepared earlier and refrigerated, then assembled and baked when needed to save time.
- Customizable: swap cheeses or add spices to suit dietary preferences and keep the concept fresh every time.
I remember the first time I served these to my family: my nephew declared them "burger magic" and went back for a third before dinner was over. They travel well, too — I once packed a tray to a picnic and they came out warm and still flaky, drawing an impromptu crowd at the park. Small adjustments like chilling the filling slightly help with assembly, and brushing with melted butter gives the exterior a professional sheen.
Ingredients
- Ground beef (1 pound): Use 80/20 for flavor and juiciness. A slightly leaner grind will still work but may be drier. I often pick a locally ground chuck for better texture.
- Garlic (2 cloves, minced): Fresh garlic provides aromatic depth. Mince finely so it disperses evenly and cooks quickly without burning.
- Parmesan cheese (1/2 cup): Choose authentic Parmigiano-Reggiano or a finely grated aged Parmesan for nuttiness. If you only have pre-grated, it still melts well.
- Cheddar cheese (1 cup, cubed): Sharp cheddar gives a tangy contrast. Cube rather than shred if you want small pockets of molten cheese inside each biscuit.
- Biscuit dough (1 can, 16.3 ounces): Canned biscuits provide a reliable flaky shell. For a homemade approach, use biscuit dough chilled and cut into rounds of similar size.
- Butter (2 tablespoons, melted): Brushed on top for a golden finish and a hint of richness. Use unsalted if your cheeses are already salty.
- Parsley (1 tablespoon, chopped): Fresh parsley brightens finished bombs and adds a touch of color for serving.
Instructions
Preheat the oven: Set the oven to 375°F (190°C) and line a baking sheet with parchment paper. Allow the oven to fully preheat so biscuits bake evenly and develop a uniform golden color. Brown the beef and garlic: In a large skillet over medium-high heat, add the ground beef and minced garlic. Break the meat into small pieces and cook about 6 to 8 minutes until no pink remains and the garlic is fragrant. Drain excess fat into a heat-safe container to avoid soggy filling. Combine cheeses with meat: Return the drained meat to the skillet off heat and stir in the Parmesan and cubed cheddar until evenly distributed. The residual heat will begin to soften the cheddar; if the mixture seems too loose, let it cool 5 minutes to firm slightly for easier assembly. Prepare biscuit rounds: Open the biscuit can and separate the dough. Using your palms or a rolling pin, flatten each biscuit to about 1/4 inch thickness so there is enough surface to fully enclose the filling without tearing. Assemble the pockets: Place about 2 to 3 tablespoons of the beef and cheese mixture into the center of each flattened biscuit. Fold the edges up and pinch to seal completely, tucking the seams underneath to create a smooth top. A complete seal prevents leaks and ensures even baking. Brush and bake: Arrange the sealed pockets on the prepared sheet about 1 inch apart. Brush each with melted butter for color and flavor. Bake 12 to 15 minutes until the tops are deeply golden and biscuits feel springy to the touch. Cool and garnish: Let them cool on the sheet 5 minutes to settle the filling. Sprinkle with chopped parsley and serve warm so the cheese is gooey and the interior steamy. Use small picks for easy serving at a party.
You Must Know
- These are best eaten hot or warm since the cheeses are gooey; refrigerate leftover bombs within two hours to maintain safety and quality.
- They freeze well for up to three months if individually wrapped; thaw overnight in the refrigerator and reheat at 350°F for 10 to 15 minutes.
- High in protein but also containing dairy and wheat, these are not suitable for vegan or gluten-free diets without substitutions.
- Use a quality cheese and drain excess beef fat to avoid a soggy interior that will make sealing more difficult.
One of my favorite aspects is how forgiving the assembly is. If a seam opens while baking, a small dab of butter over the opening usually reseals the top and maintains crispness. Family gatherings often turn into friendly debates about whether to add pickles or a smear of ketchup on the side. That playful back-and-forth is part of why I keep making them: they invite personalization and a bit of nostalgia for classic diner flavors.
Storage Tips
Store cooled bombs in an airtight container in the refrigerator for up to 3 days. To reheat, preheat the oven to 350°F and warm on a baking sheet for 8 to 12 minutes until heated through; this preserves the flaky exterior better than the microwave. For freezing, arrange cooled bombs on a tray to flash-freeze for 1 hour, then move to a labeled freezer bag for up to 3 months. Reheat from frozen by adding 5 to 10 minutes to the oven time at 350°F and cover loosely with foil if the tops brown too quickly.
Ingredient Substitutions
If you need to adapt the recipe, try turkey or plant-based crumbles in place of ground beef; increase seasoning slightly to boost flavor. For a gluten-free option, use premade gluten-free biscuit dough or make your own with a gluten-free flour blend and xanthan gum. Swap the cheddar for Monterey Jack or pepper jack for more heat, and replace Parmesan with Pecorino Romano for a sharper salt profile. Reduce butter brushing for lower fat, or use olive oil for a different aroma.
Serving Suggestions
Serve the pockets with a crisp green salad dressed in a bright vinaigrette to cut richness, or alongside fries and pickles for a classic diner feel. Small bowls of ketchup, mustard, or a smoky aioli make excellent dipping companions. For a party, arrange on a platter with toothpicks and garnish with extra parsley. Pair with a cold lager or an iced tea for a casual meal, or a bold red wine if serving as a main course.

Seasonal Adaptations
Adjust the fillings to reflect seasons: in summer add finely diced tomatoes and a spoonful of pickled jalapeños for brightness. In autumn, fold in caramelized onions or a touch of Dijon mustard for warmth. For winter gatherings, add chopped roasted red peppers and a sprinkle of smoked paprika to deepen flavor. The biscuit shell can be swapped for small puff pastry rounds in cooler months for a richer, more laminated bite.
Meal Prep Tips
To streamline service, prepare the filling a day ahead and refrigerate in an airtight container; the chilled filling firms up and makes sealing the dough easier. Keep biscuit rounds covered with a damp towel so they remain pliable. For large batches, assemble bombs on parchment-lined trays and freeze before baking; bake from frozen, adding a few minutes to the baking time. Label trays with the bake date so guests know what’s fresh.
These Garlic Parmesan Cheeseburger Bombs are a versatile, comforting bite that brings people together. Whether you serve them hot from the oven at a party or pack them for a picnic, they deliver big flavor with minimal fuss. Try making them once and you’ll see why they’ve become my go-to for casual entertaining.
Pro Tips
Drain excess fat from the cooked beef to prevent soggy pockets and help the dough seal.
Flatten biscuits to an even thickness so they bake uniformly and seal without tearing.
Allow the filling to cool slightly before filling biscuits to reduce steam and prevent leaks.
Brush with melted butter right before baking for a glossy, golden finish.
This nourishing garlic parmesan cheeseburger bombs recipe is sure to be a staple in your kitchen. Enjoy every moist, high protein slice — it is perfect for breakfast or as a wholesome snack any time.
FAQs about Recipes
Can I make the filling ahead of time?
Yes. Prepare the filling and refrigerate up to 24 hours. Assemble and bake when ready; chilled filling actually helps with sealing the dough.
Can these be frozen for later?
Freeze assembled bombs on a tray for 1 hour, then transfer to a freezer bag for up to 3 months. Bake from frozen at 375°F for about 18 to 22 minutes.
Tags
Garlic Parmesan Cheeseburger Bombs
This Garlic Parmesan Cheeseburger Bombs recipe makes perfectly juicy, tender, and flavorful steak every time! Serve with potatoes and a side salad for an unforgettable dinner in under 30 minutes.
Ingredients
Filling
Dough and Finish
Instructions
Preheat oven
Preheat oven to 375°F and line a baking sheet with parchment paper to ensure even browning.
Brown beef and garlic
Cook ground beef with minced garlic over medium-high heat until no pink remains, about 6 to 8 minutes, then drain excess fat.
Mix in cheeses
Off heat, stir Parmesan and cubed cheddar into the beef until evenly combined; let cool slightly to firm up for easier assembly.
Prepare biscuits
Open biscuit can and flatten each biscuit to about 1/4 inch thickness using your hands or a rolling pin.
Fill and seal
Place 2 to 3 tablespoons of filling in the center of each biscuit, fold edges up, and pinch to seal completely, tucking seams underneath.
Bake and finish
Brush each sealed pocket with melted butter and bake 12 to 15 minutes until golden. Cool 5 minutes, garnish with parsley, and serve warm.
Last Step: Please leave a rating and comment letting us know how you liked this recipe! This helps our business to thrive and continue providing free, high-quality recipes for you.
Nutrition
Did You Make This?
Leave a comment & rating below or tag
@kitchenfunwithmy3sons on social media!
Categories:
You might also like...

Salted Honey Pie: 5-Star Decadent Twist on a Southern Classic
Silky honey custard in a crisp, buttery crust with a glitter of flaky sea salt. This Southern-inspired sweet-salty pie is elegant, rich, and surprisingly easy.
The Ultimate Creamy Garlic Parmesan Chicken Pasta You’ll Crave Every Week
Juicy chicken, twirly pasta, and a velvety garlic Parmesan sauce come together in 30 minutes for a one-pan weeknight winner the whole family will love.
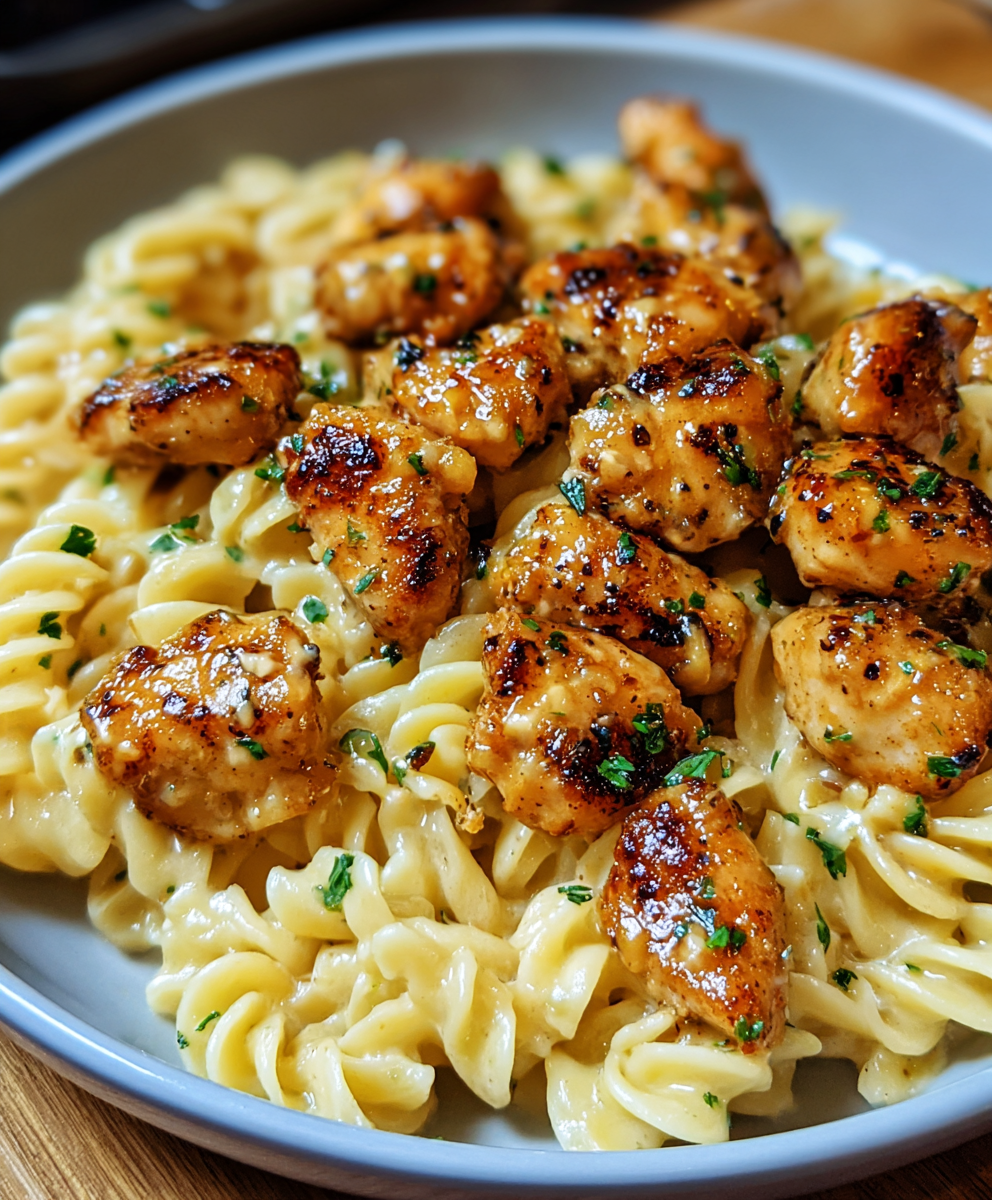
The Ultimate Creamy Garlic Parmesan Chicken Pasta You’ll Crave Every Week
Juicy chicken and twisted pasta folded into a velvety garlic-Parmesan sauce. Ready in 30 minutes, all in one skillet, and guaranteed to win dinner tonight.
Did You Make This?
Leave a comment & rating below or tag @kitchenfunwithmysons on social media!
Rate This Recipe
Share This Recipe
Enjoyed this recipe? Share it with friends and family, and don't forget to leave a review!
Comments (1)
This recipe looks amazing! Can't wait to try it.
Comments are stored locally in your browser. Server comments are displayed alongside your local comments.
Hi, I'm Melissa!
What's Popular
Get My 30-Minute Meals email series!
Quick and easy dinner ideas delivered to your inbox.